C++로 텍스트 알피지 만들기
언리얼 엔진 5를 배우기 위한 준비로 C++ 문법을 다시 익히며 만든 텍스트 RPG 예제를 정리했습니다.
새로운 준비로 다시 C++부터
새로운 준비를 위해 학원에서 언리얼 엔진 5를 배우고 있다. 본격적으로 언리얼을 다루기 전에 먼저 C++부터 다시 배우고 있는데, 학부생 때 배운 적도 있고 중간중간 만져본 경험도 있어서 완전히 생소하지는 않았다.
이번 내용은 콘솔에서 캐릭터를 만들고, 직업을 선택하고, 던전에 들어가 슬라임과 전투하고, 드롭 아이템을 인벤토리에 넣고, 포션 제작소에서 레시피를 검색하는 구조다.
전체 흐름
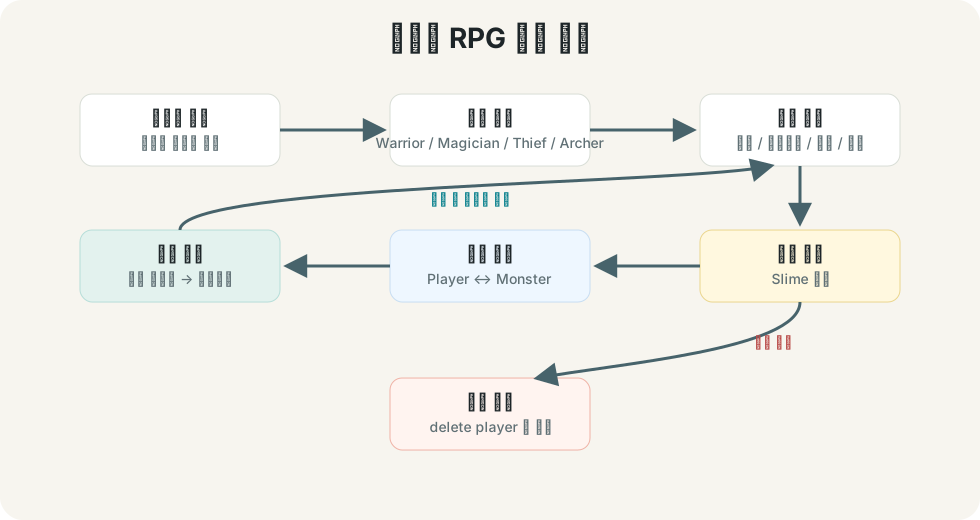
- 플레이어 이름과 기본 능력치를 입력한다.
- 직업을 선택한다.
- 선택한 직업에 맞는
Player파생 클래스를 동적 생성한다. - 메인 메뉴에서 던전 입장, 인벤토리 확인, 포션 제작소, 게임 종료를 선택한다.
- 던전에 들어가면
Slime을 생성하고 전투 루프를 돌린다. - 몬스터를 처치하면 드롭 아이템을
Item으로 변환해 인벤토리에 넣는다.
핵심 루프는 이런 형태다.
Player* player = nullptr;

JobType selectedJob = menu.PrintJobSelection();
switch (selectedJob)
{
    case JobType::Warrior:
        player = new Warrior(menu.GetName(), menu.GetStat());
        break;

    case JobType::Magician:
        player = new Magician(menu.GetName(), menu.GetStat());
        break;

    case JobType::Thief:
        player = new Thief(menu.GetName(), menu.GetStat());
        break;

    case JobType::Archer:
        player = new Archer(menu.GetName(), menu.GetStat());
        break;

    default:
        break;
}
여기서 직업 선택 결과에 따라 Warrior, Magician, Thief, Archer 중 하나를 생성한다. 변수 타입은 Player*이지만 실제 객체는 파생 클래스다. C++에서 상속과 다형성을 연습하기 좋은 형태였다.
Player와 직업 클래스
Player는 플레이어의 기본 상태를 가진 부모 클래스다. 이름, 직업, 레벨, HP, MP, 공격력, 방어력, 인벤토리를 멤버로 가진다. 그리고 Attack은 순수 가상 함수로 선언되어 있다.
class Player
{
public:
    Player(std::string& name, int* stats);
    virtual ~Player();

    void PrintPlayerStatus();
    void Damage(int damage, int* realDamage);
    void AddItem(Item& item);
    void PrintInventory();

    virtual void Attack() = 0;
    virtual void Attack(Monster* monster) = 0;

protected:
    std::string name;
    JobType job;
    int level;
    int hp;
    int mp;
    int power;
    int defence;

    std::vector<Item> inventory;
};
직업 클래스들은 Player를 상속한다. 예를 들어 Warrior는 HP와 방어력을 올리고, Magician은 MP를 올린다. Thief와 Archer는 공격력을 올린다.
Warrior::Warrior(std::string& name, int* stats)
    : Player(name, stats)
{
    hp += Const::PLAYER::SPCECIAL_STAT_INCREASE_AMOUNT;
    defence += Const::PLAYER::SPCECIAL_STAT_INCREASE_AMOUNT;
}
각 직업은 Attack도 오버라이딩한다. 메시지만 출력하는 Attack()과 실제 몬스터를 공격하는 Attack(Monster* monster)가 따로 있다.
void Archer::Attack(Monster* monster)
{
    int realDamage = 0;
    monster->Damage(power, &realDamage);

    cout << monster->GetName() << "에게 " << realDamage << "데미지!" << endl;
}
이 구조를 보면서 C++의 상속, 가상 함수, 동적 할당, 포인터 기반 다형성을 다시 만져볼 수 있었다.
전투와 데미지 계산
전투는 플레이어와 몬스터가 서로 공격하는 단순한 루프다.
while (player->GetHp() > 0 && monster->GetHp() > 0)
{
    player->Attack(monster);
    monster->Attack(player);
}
데미지는 공격력에서 방어력을 뺀 값으로 계산한다. Player::Damage와 Monster::Damage 모두 비슷한 구조다.
void Player::Damage(int damage, int* realDamage)
{
    assert(damage >= 0);

    *realDamage = damage - defence;
    *realDamage = (*realDamage <= 0) ? 0 : *realDamage;

    hp -= *realDamage;
}
코드에서는 실제 들어간 데미지를 realDamage 포인터로 밖에 돌려준다. 그래서 공격한 쪽에서 "몇 데미지를 줬는지" 출력할 수 있다. 지금은 단순한 방식이지만, 전투 결과를 호출자에게 돌려주는 흐름을 연습하기에는 괜찮았다.
몬스터와 드롭 아이템
몬스터 쪽도 부모 클래스와 파생 클래스로 나누었다. Monster는 이름, HP, 공격력, 방어력, 드롭 아이템 목록을 가진다. Slime은 Monster를 상속하고, 생성자에서 드롭 아이템으로 슬라임 젤리를 추가한다.
Slime::Slime(std::string name, int hp, int power, int defence)
    : Monster(name, hp, power, defence)
{
    dropItems.push_back(MonsterDropItem(std::string("슬라임 젤리"), 30));
}
몬스터를 처치하면 드롭 아이템을 가져와 Item으로 바꾼 뒤 플레이어 인벤토리에 넣는다.
std::vector<MonsterDropItem> dropItems = monster->GetDropItems();
for (auto& item : dropItems)
{
    Item newItem(item);
    player->AddItem(newItem);
}Item에는 MonsterDropItem을 받는 생성자가 있어서, 몬스터 드롭 데이터를 인벤토리 아이템으로 변환할 수 있다.
Item::Item(MonsterDropItem& dropItem)
    : name(dropItem.GetName())
    , price(dropItem.GetPrice())
{}
이 부분은 작은 코드지만 객체 사이의 데이터 변환을 분리해둔 점이 눈에 들어왔다. 몬스터가 드롭하는 정보와 플레이어가 들고 다니는 아이템을 같은 클래스로 뭉개지 않고, 생성자를 통해 변환하는 흐름이다.
인벤토리
플레이어는 std::vector<Item>으로 인벤토리를 가진다. 아이템을 추가할 때는 최대 개수를 확인한다.
void Player::AddItem(Item& item)
{
    if (inventory.size() >= Const::PLAYER::INVENTORY_CAPACITY)
    {
        cout << "인벤토리가 가득 찼습니다. 아이템을 추가할 수 없습니다." << endl;
        return;
    }

    inventory.emplace_back(item);
}
인벤토리 출력도 단순하게 구성되어 있다.
void Player::PrintInventory()
{
    cout << "[ 인벤토리 (" << inventory.size() << "/" << Const::PLAYER::INVENTORY_CAPACITY << ") ]" << endl;

    int size = inventory.size();
    for (int i = 0; i < size; ++i)
    {
        cout << i + 1 << ". " << inventory[i].GetName() << " (" << inventory[i].GetPrice() << "G)" << endl;
    }
}std::vector를 사용하니 아이템 목록을 다루는 코드는 비교적 편했다. C++을 다시 보면서 컨테이너를 직접 활용하는 감각도 같이 되살릴 수 있었다.
포션 제작소
Step8에는 포션 제작소도 들어 있다. 실제 제작 기능보다는 레시피 조회 기능에 가깝다. Ingredient, PotionRecipe, AlchemyWorkshop 클래스로 나뉘어 있다.
AlchemyWorkshop은 생성자에서 기본 레시피를 등록한다.
AlchemyWorkshop::AlchemyWorkshop()
{
    recipes.push_back(PotionRecipe("HP포션", { Ingredient("허브", 1), Ingredient("맑은물", 1) }));
    recipes.push_back(PotionRecipe("스태미나포션", { Ingredient("허브", 1), Ingredient("베리", 1) }));
}
그리고 전체 레시피 보기, 이름으로 검색, 재료로 검색 기능을 제공한다.
void AlchemyWorkshop::SearchByIngredient(const std::string& ingredient)
{
    int count = 0;
    for (auto& recipe : recipes)
    {
        const auto& ingredients = recipe.GetIngredients();
        for (const auto& ing : ingredients)
        {
            if (ing.GetName() == ingredient)
            {
                cout << "-> " << recipe.GetName() << " (";
                // ingredients 출력
                cout << ")" << endl;
                count++;
                break;
            }
        }
    }
    cout << "총 " << count << "개의 레시피를 찾았습니다." << endl;
}
이 기능은 전투와 직접 이어지지는 않지만, 텍스트 RPG에 메뉴와 데이터 검색 구조를 붙여보는 연습이 되었다. 단순히 캐릭터가 싸우는 것에서 끝나지 않고, 별도 시스템을 메뉴에 연결하는 흐름을 만들어본 셈이다.
다시 보면서 느낀 점
이번 코드는 언리얼 엔진 5를 배우기 전에 C++ 감각을 다시 끌어올리는 용도로 좋았다. 상속, 가상 함수, 헤더와 cpp 분리, enum class, namespace 상수, vector, 동적 할당과 delete까지 한 번씩 만져볼 수 있었다.
물론 지금 코드가 완성형이라는 뜻은 아니다. new와 delete를 직접 쓰고 있고, Menu의 stat 배열도 동적 할당 후 해제되지 않는다. 나중에 다시 정리한다면 std::unique_ptr, std::array, 참조 반환 방식, const 정확성 같은 부분을 더 다듬어볼 수 있을 것 같다.
그래도 지금 단계에서는 "C++로 객체를 나누고, 포인터로 다형성을 사용하고, 콘솔 게임 루프를 구성한다"는 목적에는 잘 맞는 예제였다. 언리얼로 넘어가기 전에 C++의 기본 감각을 다시 잡는 준비 운동으로는 충분히 의미가 있었다.